February 4, 2018
iOS real device test automation tutorial using Appium and Python
Appium for iOS
In this post, we are going to explain the necessary steps required to implement a basic iOS simulator and real device based test automation using Appium and Python. I assume that the reader is familiar with the following…
- Mac OS basics
- iOS basics (ex. Xcode, singing certificates, etc)
- Appium automation framework
- Python scripting

We will start with the simulator setup…
Simulator setup
- We are going to use the appium desktop version. You can try the command line version if you wish but the desktop version is going to make appium installation process easy and allows us to inspect the iOS application. I used the following dmg file
- Install carthage, a simple decentralized dependency manager for Cocoa…
|
1 |
brew install carthage |
- Install libimobiledevice, a cross platform protocol library to communicate with iOS devices
|
1 |
brew install libimobiledevice |
- Install ios-deploy used to install and debug iOS apps without using Xcode
|
1 |
brew install ios-deploy |
- We need an iOS test app to play with. You can use your own test app or you may clone the following test app.
|
1 |
git clone git@github.com:appium/ios-test-app.git |
- Go to the cloned directory and open the app Xcode project
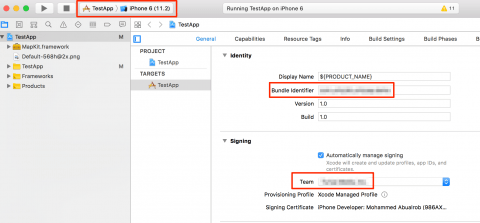
- You do not need an iTunes account to use a simulator but later we are going to use a real device. For a real device, you need to change the app bundle ID and team so that they match what you have on iTunes connect. To run the app in a simulator, just select the simulator then click the run icon as shown in the screenshot blow…
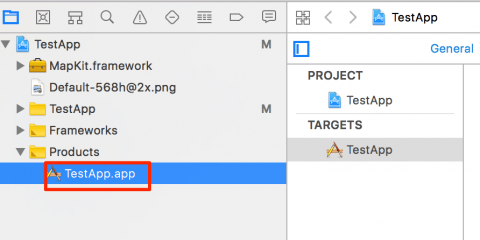
- After you run the app in the simulator, Xcode generates *.app folder. To see where this folder is located, right click TestApp.app under Products then click show in finder. You can copy it to another folder if you wish (ex. /Users/user/Desktop/TestApp.app)
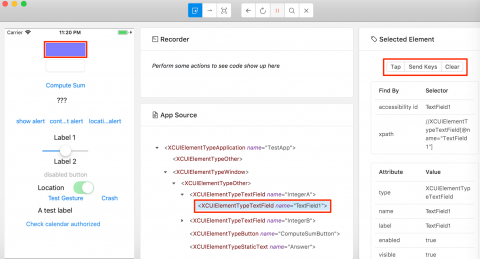
- A typical test case navigates the UI by tapping, entering text, retrieving text and doing some sort of assertions. In order to navigate the UI, we need to identify UI elements. The Appium desktop server ships with an inspector that we can use to capture that
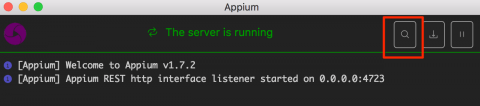
- On Mac, go to Applications folder and launch the Appium server then click on the blue button to start the server
- Start appium inspector session by clicking on the search icon
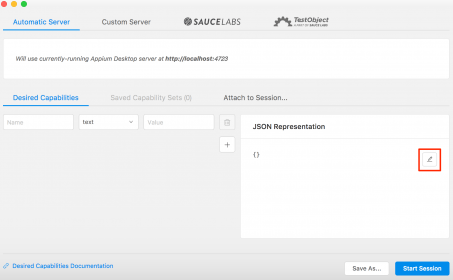
- Under JSON representation, click the edit icon to change the desired appium capabilities
- Paste the following JSON then click save
|
1 2 3 4 5 6 7 |
{ "platformName": "iOS", "platformVersion": "11.2", "deviceName": "iPhone 7", "automationName": "XCUITest", "app": "/Users/user/Desktop/TestApp.app" } |
- You can chose the simulator and iOS version you want
- Point to the simulator *.app folder that you generated in Xcode
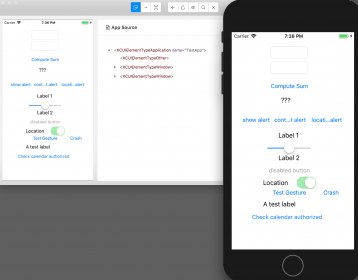
- Click Start Session button to launch the simulator. If everything is ok, you should get something like…
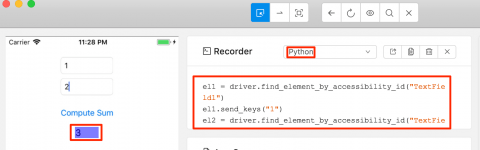
- Our test case is going to enter two numbers in the text boxes then compute the sum by clicking the compute sum label. Appium inspector allows us to record these steps then we can copy & paste the generated code to our test code. Let us record that by clicking on the record icon
- Click on the first text box, click on send keys then enter 1
- Similarly, click on the second text box then enter 2
- Click on the compute label then click tap
- Click on the answer label then click tap (this is not going to do anything, we just need to get the locator)
- From the menu, select Python as the client language. Copy the code and save it so that we can use it later in the test script
- The code should look like the following…

|
1 2 3 4 5 6 7 8 |
el1 = driver.find_element_by_accessibility_id("TextField1") el1.send_keys("1") el2 = driver.find_element_by_accessibility_id("TextField2") el2.send_keys("2") el3 = driver.find_element_by_accessibility_id("ComputeSumButton") el3.click() el4 = driver.find_element_by_accessibility_id("Answer") el4.click() |
- Our test script is going to communicate with the Appium server using a Python client. To install the client execute the following command
|
1 |
pip install Appium-Python-Client |
- If that does not work, try installing from source
|
1 2 3 |
git clone git@github.com:appium/python-client.git cd python-client python setup.py install |
- Just like we were able to drive the application using appium inspector, we should be able to do the same using any supported language such as Python. The code snippet below (test.py) does exactly that
|
1 2 3 4 5 6 7 8 9 10 11 12 13 14 15 16 17 18 19 20 21 22 23 24 25 26 27 28 29 30 31 32 33 34 35 36 37 38 39 40 |
# Python unit testing framework import unittest # Appium Python client from appium import webdriver # Open iOS simulator 11.2 and install TestApp desired_caps = { "platformName": "iOS", "platformVersion": "11.2", "deviceName": "iPhone 7", "automationName": "XCUITest", "app": "/Users/user/Desktop/TestApp.app" } # Connect to Appium server on local host driver = webdriver.Remote('http://localhost:4723/wd/hub', desired_caps) # Test cases class Tests(unittest.TestCase): def setUp(self): # Enter first number text1 = driver.find_element_by_accessibility_id("TextField1") text1.click() text1.send_keys("1") # Enter second number text2 = driver.find_element_by_accessibility_id("TextField2") text2.click() text2.send_keys("1") # Compute sum comp = driver.find_element_by_accessibility_id("ComputeSumButton") comp.click() # Get answer self.answer = driver.find_element_by_accessibility_id("Answer") def test_compute_sum(self): # Make sure the sum is 2 self.assertEqual(self.answer.text, "2") # Run test cases unittest.main() |
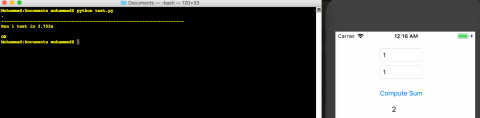
- From the command line, run the test as follows…
|
1 |
python test.py |
iOS real device setup
Now we want to drive the iOS application using a physical device. This process may encounter hiccups as it is not perfectly reliable.
- Make sure that you have both node and npm installed. The easiest way to do that is to download the desktop installer. You can also use brew to install both node and npm. I used the following link
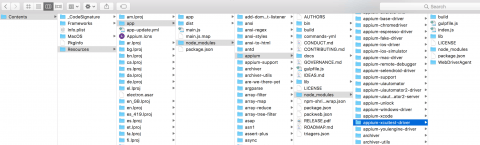
- Go to the installation folder of the Appium server then navigate all the way to the WebDriverAgent folder and execute the following code…
|
1 2 3 4 |
cd /Applications/Appium.app/Contents/Resources/app/node_modules/appium/node_modules/appium-xcuitest-driver/WebDriverAgent/ mkdir -p Resources/WebDriverAgent.bundle/ ./Scripts/bootstrap.sh -d |
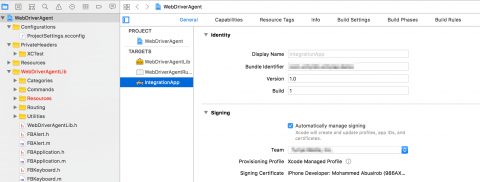
- Now open the xcode project inside the Webdriveragent folder
- To find the folder take a look at the following screenshot…
- As we indicated earlier, use the right application bundle ID and team so that you can deploy apps to physical devices
- Try to build the xcode project. You should be able to do so
- From the command line, execute the following command. It should install the WebDriverAgentRunner. Use your own device ID
|
1 |
xcodebuild -project WebDriverAgent.xcodeproj -scheme WebDriverAgentRunner -destination 'id=your device id' test |
- Note that you need to provide the device ID of the phone or tablet you are using. You can get the device ID from Xcode. Go to the Window menu, then go to Devices and Simulators. Select your device and copy the UDID number
- If the phone asks to trust your computer then click trust otherwise you can not build to device
- Just like we did in the simulator case, use appium inspector to inspect the app running on the phone.
- Use the following appium capabilities
|
1 2 3 4 5 6 7 8 9 10 |
desired_caps ={ "platformName": "iOS", "platformVersion": "11.0", "deviceName": "iPhone 6P iOS 11", "automationName": "XCUITest", "app": "/Users/user/Desktop/IntegrationApp.app", "xcodeOrgId": "10 characters org id", "xcodeSigningId": "iOS Developer: Your name here", "udid": "40 characters udid" } |
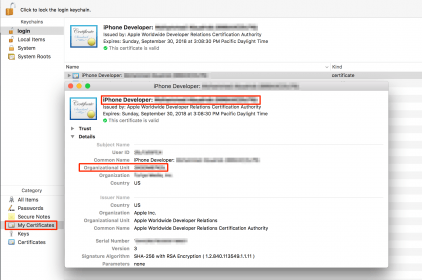
- Note that in this case, you need to specify your phone name, your xcocde org id and signing id as well. You can get the org id and signing id by opening keychain application then opening your certificate file
- If everything is fine, you should see…
- Similarly, we are going to click on the Alerts label then verify that there is another label displayed with Label as the text. Just record that in appium inspector and copy it to the following Python script…

|
1 2 3 4 5 6 7 8 9 10 11 12 13 14 15 16 17 18 19 20 21 22 23 24 25 26 27 28 29 30 31 32 33 34 35 |
# Python unit test framework import unittest # Appium Python client from appium import webdriver # Information needed to connect to iOS real device desired_caps = { "platformName": "iOS", "platformVersion": "11.0", "deviceName": "iPhone 6P iOS 11", "automationName": "XCUITest", "app": "/Users/user/Desktop/TestApp.app", "xcodeOrgId": "10 characters org id", "xcodeSigningId": "iOS Developer: your name here", "udid": "40 characters udid" } # Appium client driver = webdriver.Remote('http://localhost:4723/wd/hub', desired_caps) # Test cases class Tests(unittest.TestCase): def setUp(self): # Find and click on the Alerts label alerts = driver.find_element_by_accessibility_id("Alerts") alerts.click() # Check if label exists self.label = driver.find_element_by_accessibility_id("label") def test_compute_sum(self): # Verify that the label text is Label self.assertEqual(self.label.text, "Label") # Run test cases unittest.main() |
If you run the script above as…
|
1 |
python test.py |
You should see the app executed on the phone and the test case passes…
References
Thanks for reading. Please use the comments section below for feedback.


About Author
Mohammed Abualrob
Software Engineer @ Cisco
2 Comments
Thank you so much for very detailed steps.
Hi 🙂 great tutorial 😉
but I am stacked on the step( I run the app on simulator). where I should get the file with .app extension.
What is more there is also no Product folder.
Any tips why?
Thanks in advance